


Transforming your living space doesn’t have to be a daunting task. This post is all about those moments when you look at your empty walls and think, “I need something special here.” If you’ve been craving a fresh look for your home, you’re in the right place. DIY wall art is an affordable and creative way to breathe new life into your space, making it uniquely yours.
If you’re someone who loves home decor and enjoys getting hands-on with projects, this list of 19 DIY wall art ideas is perfect for you. Whether you’re a seasoned crafter or just starting out, these ideas provide options for every skill level. You’ll find inspiration that speaks to your style and helps reflect your personality throughout your home.
Get ready to dive into a world of creativity! With these DIY wall art projects, you will transform your walls into a masterpiece. From macramé hangings to inspirational quote art, these ideas will fill your space with charm and character. Let’s explore how you can take your walls from drab to fab with just a bit of effort and imagination!
Key Takeaways
– Discover 19 unique DIY wall art ideas that cater to various styles and skill levels, making it easy to find a project that suits you.
– Learn how to create stunning pieces from materials you may already have at home, promoting sustainability through upcycling.
– Find inspiration in techniques like string art and abstract painting that can add a personal touch to your decor.
– Each idea comes with detailed steps and tips, helping you execute your project with confidence and ease.
– Enjoy the process of crafting while enhancing your home’s aesthetic, creating a space that truly reflects your personality.
1. Macramé Wall Hanging
Macramé wall hangings are not just a trend; they bring a cozy, bohemian vibe to your home. The intricate knots and natural fibers create a beautiful texture that softens any space. Using cotton rope, you can craft pieces that vary in size and design, making them perfect for above a bed or in a living area.
You don’t need a lot of experience to dive into macramé. Start with simple patterns and let your creativity flow. For a budget-friendly option, check local craft stores for affordable materials or even repurpose old ropes.
Consider these steps to create your own macramé masterpiece:
– Cut equal lengths of cotton rope and secure them to a wooden dowel using Larks Head knots.
– Begin crafting your design using square knots and half-hitches.
– Once your piece is the desired length, trim the ends for a polished look.
– Hang your creation prominently to showcase your handiwork!
This project not only beautifies your space but also offers a calming crafting experience, allowing you to unwind while creating something special.
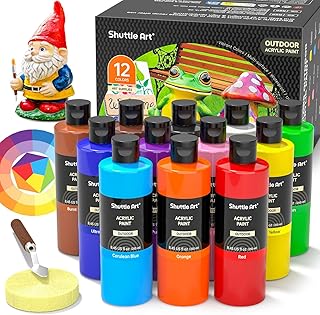
2. Abstract Canvas Painting
Unleash your inner artist with an abstract canvas painting that reflects your style. This form of DIY wall art celebrates creativity, allowing you to experiment with colors and shapes freely. Whether you opt for bold splashes or soft washes, the result will surely be a conversation starter in your home.
Gather some acrylic paints and a blank canvas, and let your imagination guide you. Mixing colors or using unconventional tools like sponges can enhance texture and depth. The beauty of abstract art lies in its flexibility, making it suitable for various spaces.
To get started on your abstract masterpiece:
– Choose a color palette that resonates with you.
– Start layering shapes and lines, allowing spontaneity to take over.
– Experiment with techniques like splattering or dragging paint for unique effects.
– Once dry, hang it proudly in your favorite spot!
Your vibrant abstraction will add a splash of personality and artistic flair to your living space.
3. Framed Fabric Squares
Turn your favorite fabric swatches into eye-catching wall art! This DIY project is perfect for textile lovers, allowing you to showcase patterns and colors that resonate with your style. Mix and match fabrics to create a chic gallery wall that highlights your personality.
Choose both old and new frames, giving them a fresh coat of paint if desired. This project is quick, affordable, and adds warmth to your decor.
Here’s how to create your fabric square art:
– Cut fabric into square pieces that fit your frames.
– Use adhesive to attach the fabric to the frame backing.
– Frame each piece and arrange them on your wall in a pleasing pattern.
– Step back to admire your unique fabric art!
This charming project enhances your walls while allowing you to display your favorite textiles creatively.
Framed Fabric Squares
Editor’s Choice


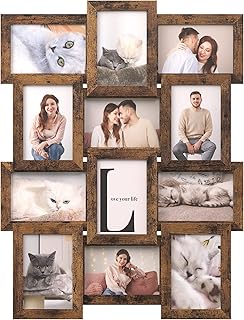
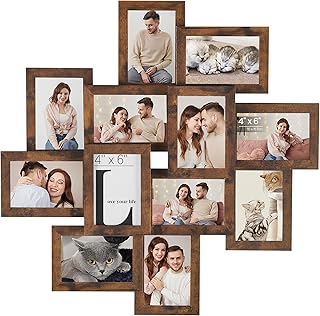
4. Photo Collage
A photo collage is a timeless way to celebrate memories while enhancing your wall decor. Curate a collection of cherished moments, from family gatherings to travel adventures, and display them creatively. By choosing a consistent theme or color palette, you can create a harmonious look that unifies the space.
Print your images in various sizes to add interest, and consider mixing frames for a dynamic effect. This project not only personalizes your space but also serves as a daily reminder of the moments you hold dear.
To create your own photo collage:
– Gather your favorite photos and decide on a layout.
– Print the photos in different sizes.
– Frame them or attach them with clips or tape.
– Arrange them on the wall, securing with adhesive or hooks.
– Step back and enjoy your memory wall!
A photo collage adds character to your home, beautifully narrating your story through images.
Photo Collage
Editor’s Choice


📹 Related Video: Design Expert’s Guide To The Perfect Gallery Wall | Tricks of the Trade
5. Nature-Inspired Wall Art
Bring the beauty of nature indoors with art inspired by the great outdoors. Collect leaves, flowers, or twigs and transform them into stunning pieces that evoke serenity and tranquility. This DIY project is an excellent way to incorporate natural elements into your home decor.
Press flowers between paper or create a shadow box filled with twigs for a rustic aesthetic. The earthy tones of your creations will bring warmth to your walls.
To craft your nature-inspired wall art:
– Gather dried flowers or leaves and allow them to dry.
– Arrange them in a frame or shadow box creatively.
– Secure them in place with glue.
– Hang your art in a joyful spot!
Nature-inspired wall art celebrates the beauty of the seasons while adding a calming touch to your home.
Nature isn’t just a backdrop; it’s a DIY wall art studio. Create nature-inspired wall art by pressing flowers or twigs, and watch a blank wall tell a calmer story. Start small: gather leaves today and transform them into a cozy centerpiece for your space.
How To Choose the Right DIY Wall Art
When it comes to DIY wall art, several factors can help you make the perfect choice for your home decor. Here are some key points to consider for selecting the ideal wall art project that matches your style and space.
1. Style
Your wall art should reflect your personal taste and the overall vibe of your home. Think about whether you prefer modern, rustic, abstract, or traditional styles. Browse online platforms like Pinterest or Instagram for inspiration, and save images that resonate with you. This will aid you in narrowing down your options and finding a project that excites you.
2. Space & Size
Consider where you want to place your artwork. Measure the wall space you want to decorate to determine what size will work best. Large pieces can make a bold statement, while smaller pieces can be grouped for an eye-catching gallery wall. A good rule of thumb is to leave some empty space around your art to avoid looking crowded.
3. Material
The materials you choose can impact the look and durability of your wall art. Common materials include canvas, wood, fabric, or even upcycled items. For example, using reclaimed wood can add a rustic touch, while fabric art can bring warmth and texture to your walls. Ensure that the materials you select fit both your design vision and your skill level.
4. Budget
DIY projects can vary significantly in cost. Set a budget before you start to avoid overspending. Consider using materials you already have at home, or scouting thrift stores for inexpensive items to repurpose. By keeping your budget in mind, you can create stunning wall art without breaking the bank.
5. Skill Level
Evaluate your crafting skills before choosing a project. Some ideas, like simple line art or painted rocks, are beginner-friendly, while others, like macramé wall hangings or string art, may require more experience. Pick a project that matches your abilities to ensure you enjoy the process rather than feel overwhelmed.
6. Theme
Consider any themes you want to incorporate in your home decor. For example, nature-inspired wall art can bring the outdoors inside, while abstract pieces can add a contemporary touch. Establishing a theme will help unify your decor and guide your project selection.
Pro Tip: Don’t hesitate to combine different styles or materials! Mixing elements can create a unique piece that truly reflects your personality. Embrace your creative side and let your imagination guide you!
By following these guidelines, you can confidently choose the right DIY wall art project that transforms your space into a masterpiece. Enjoy the process and remember to have fun with your creations!
6. Simple Line Art
Embrace the elegance of simplicity with line art that captivates the eye. This minimalist approach can transform any wall into a stylish gallery. Using just a few continuous lines, you can create beautiful portraits or abstract shapes that enhance your decor.
Grab a canvas or thick paper and some black ink or markers. You can sketch freely or use reference images for inspiration. The contrast of black against your wall color makes this art style versatile and chic.
Follow these steps to create your own line art:
– Choose a subject or let your imagination guide you.
– Sketch your design in one continuous line.
– Once satisfied, let the ink dry and hang it up!
This project beautifully embodies the concept that less can be more, offering a striking addition to any room.
7. Inspirational Quote Art
Inspire yourself daily with DIY inspirational quote art! Select quotes that resonate with you, whether from a beloved book, song, or personal mantra. This art not only beautifies your space but also uplifts your spirit every time you see it.
Hand-letter your quotes, use stencils, or print them out with typography software. Experiment with colors and backgrounds, such as watercolors or patterned paper, to make your art pop.
Here’s how to create your motivational masterpiece:
– Choose a quote and design format.
– If hand-lettering, practice the style before committing.
– Create a colorful background using paints or patterns.
– Adhere the quote onto the background once dry.
Inspirational quote art serves as a daily reminder to stay positive and motivated, brightening your space and spirit.
8. Upcycled Window Frame Art
Don’t let that old window frame go to waste! Transform it into a stunning piece of wall art that adds rustic charm to your home. Upcycling window frames not only minimizes waste but also creates a unique statement piece that reflects your style.
Fill the frame with photos, fabric, or even a small herb garden for a creative touch. You can also paint a scene on the glass or use wire for a 3D effect.
Here’s how to give your window frame new life:
– Clean and sand the window frame if needed.
– Decide what to display inside the frame.
– Fill it with your chosen materials and secure them.
– Hang it on your wall to showcase your vintage charm!
Upcycling is not only economical; it’s a fantastic way to add character and personality to your home.
You might also like


9. Wooden Pallet Art
Rustic wooden pallet art is a fantastic way to introduce natural texture to your walls. This eco-friendly project allows for creativity while adding depth and character to your space. Whether you choose to paint, stencil, or arrange pallets to form shapes, the result will be a unique piece.
Ideal for both indoor and outdoor settings, wooden pallet art can serve as a striking statement or a charming garden sign. The warmth of the wood creates a welcoming atmosphere.
To craft your own wooden pallet art:
– Sand the pallets to smooth rough edges.
– Decide on your design and paint or stencil it.
– Allow it to dry, then hang or display creatively.
With wooden pallet art, you’re not just creating; you’re sharing a story through upcycled materials.
10. Geometric Wall Art
Geometric designs are sleek and modern, making them a stylish choice for wall art. You can create this aesthetic using paints, paper, or wood to achieve a contemporary look. The sharp lines and bold colors can instantly elevate your decor.
Start with a clean canvas and choose a geometric pattern that speaks to you. Using painter’s tape can help achieve crisp edges, whether you’re painting or cutting shapes from colored paper.
Here’s how to create your geometric masterpiece:
– Plan your design and tape off areas for painting.
– Fill in the sections with your chosen colors.
– Remove the tape once dry for clean lines.
Geometric wall art creates balance and symmetry, enhancing the overall aesthetic of your living space.
11. Seasonal Art Display
Celebrate each season with a rotating art display that keeps your home feeling fresh. Create simple artworks that reflect the beauty of each season, from vibrant summer florals to serene winter landscapes. This project engages your creativity throughout the year.
Use inexpensive materials like paper and paint, or incorporate natural elements like leaves and pinecones. Swapping out your art with the seasons keeps your environment vibrant and inviting.
To create your seasonal art display:
– Choose a seasonal theme for your artwork.
– Use your chosen materials to create the art.
– Display it on a wall or frame for easy updates.
A seasonal art display brings the beauty of nature indoors, creating a warm ambiance in your home.
Fun fact: rotating seasonal DIY wall art every few weeks can make a room feel 30% fresher and more welcoming. Swap in inexpensive materials like paper and paint, or add natural elements to reflect each season.
12. String Art
String art is a delightful way to create intricate designs using nails and thread. By hammering nails into a wooden board or canvas and wrapping string around them, you can form beautiful patterns or shapes. The results can be surprisingly stunning!
Think of shapes like hearts or words that hold meaning for you. This DIY project encourages creativity while allowing you to showcase your craftsmanship.
Follow these steps to craft your string art piece:
– Lightly sketch your design on the board.
– Hammer nails into the board along your sketch.
– Wrap string around the nails to create your pattern.
– Once finished, hang it up and enjoy your unique art!
String art combines creativity with skill, resulting in a striking display that captures attention.
String Art
Editor’s Choice


13. Painted Rocks
Find inspiration in nature with playful painted rocks! This DIY wall art idea adds a whimsical touch to your decor. Collect smooth stones and turn them into colorful mini masterpieces with simple paints. You can create cute animals, designs, or even motivational phrases!
Display your painted rocks on shelves, hang them on walls using twine, or use them to enhance your garden. This fun project encourages creativity for all ages, making it a great family activity.
To create your painted rock art:
– Clean and dry your rocks thoroughly.
– Use bright acrylic paints to bring your designs to life.
– Seal them if desired for protection.
– Arrange them on your wall or garden for a playful touch!
Painted rocks add charm to your home while inspiring creativity in everyone.
Painted Rocks
Editor’s Choice


14. Fabric Wall Art Panels
Large fabric panels can transform your walls into stunning art pieces without overwhelming the space. This DIY project is perfect for those who appreciate textiles, allowing you to add color and pattern effortlessly. Choose vibrant prints or rich solid colors, or mix various fabrics for an eclectic effect.
Stretch the fabric around a canvas or frame, securing it at the back. This method easily covers significant wall areas, creating a striking impact.
Here’s how to create your fabric wall art:
– Cut the fabric to size, leaving extra for stapling.
– Stretch the fabric around the canvas, stapling it tightly at the back.
– Hang your finished fabric art to enliven any space!
Fabric wall art panels are an adaptable addition to your decor, easily updated with the seasons or your mood.
You Might Also Like


15. Paint Chip Art
Utilize leftover paint chips creatively with a fun paint chip art project! These colorful pieces can be cut into shapes to form a stunning mosaic or abstract design on your walls. The variety of colors allows for endless creative possibilities!
Gather paint chips from home improvement stores or repurpose old ones you have at home. This budget-friendly project is a playful way to incorporate color and texture into your decor.
To create your paint chip art:
– Cut the paint chips into your desired shapes.
– Arrange the shapes on a canvas or paper until you’re pleased with the design.
– Secure them down with glue.
– Hang your colorful creation on the wall!
Paint chip art is a fun and eco-conscious way to brighten your space with creativity.
16. DIY Wall Mural
For those feeling adventurous, a DIY wall mural can create a breathtaking focal point in any room! Whether you want to paint a serene landscape, a whimsical design, or an abstract pattern, this project invites your imagination to run wild.
Lightly sketch your design on the wall before painting to ensure it aligns with your vision. Choose durable paints for longevity, and gather all your supplies ahead of time. While it may take some effort, the results will be stunning!
Here’s how to tackle your wall mural:
– Plan your mural and sketch it lightly on the wall.
– Use painter’s tape for clean edges if needed.
– Start painting, using different brushes for varied textures.
– Once dry, step back to admire your large-scale artwork!
A wall mural showcases your creativity boldly, transforming any space into a vibrant canvas.
17. 3D Wall Art
Elevate your wall art with the unique appeal of 3D designs! This creative style allows you to add depth using materials like wood, cardboard, or fabric layers. Craft geometric shapes, whimsical scenes, or abstract designs that pop off the wall.
This project encourages experimentation with textures and materials, making each piece uniquely yours. Shadow boxes or layered paper can enhance the three-dimensional effect of your creations.
To create your 3D wall art:
– Choose your design concept and gather your materials.
– Cut and paint your materials as needed.
– Assemble layers and secure them on the wall.
– Hang your eye-catching 3D art!
3D wall art adds intrigue and creativity, making it a standout feature in your home decor.
18. Upcycled Door Art
Transform an old door into a stunning piece of wall art that adds vintage charm to your home decor! Upcycling doors not only helps the environment but also creates a unique conversation starter. You can paint, stencil, or use the door as a canvas for mixed media art.
The rustic look of an upcycled door adds character to any space, whether hung on a wall or propped against it.
Here’s how to bring new life to your old door:
– Clean the door thoroughly and decide on your design approach.
– Paint or stencil your design, allowing it to dry.
– Hang the door as a focal piece or lean it against a wall for added charm.
Upcycled door art is not only eco-friendly but also enhances your home’s beauty with its unique history.
Did you know upcycling just one old door can save over 40 pounds of waste from landfills? Transform it into DIY wall art with paint, stencil, or mixed media—it’s affordable, unique, and totally shareable.
Upcycled Door Art
Editor’s Choice


19. Chalkboard Wall Art
Chalkboard wall art is a versatile and interactive way to express your creativity! Whether you want to draw designs, write inspiring quotes, or use it as a menu board, chalkboard art adds a playful touch to your decor. You can paint a section of your wall with chalkboard paint or use a large framed board.
This dynamic art allows for constant change, letting you refresh your space whenever inspiration strikes! It’s also a great activity for families and kids.
To create your chalkboard wall art:
– If painting, prepare the wall surface and apply chalkboard paint.
– Allow it to dry completely before using.
– Start creating fun designs or messages with chalk!
A chalkboard wall or art piece encourages creativity and interaction, making it a delightful addition to any home!
Conclusion
Your walls have endless potential, and with these 19 DIY wall art ideas, you can truly transform your living space into a vibrant expression of your style and personality. Whether you prefer the elegance of macramé, the charm of fabric panels, or the creativity of string art, there’s a project here for everyone.
Not only will these projects beautify your home, but they will also give you a sense of accomplishment and joy as you create them. So grab your supplies and let your creativity flow; your walls are waiting for their masterpiece!
Note: We aim to provide accurate product links, but some may occasionally expire or become unavailable. If this happens, please search directly on Amazon for the product or a suitable alternative.
This post contains Amazon affiliate links, meaning we may earn a small commission if you purchase through our links, at no extra cost to you.
Frequently Asked Questions
What supplies do I need to get started with DIY wall art?
Getting started with DIY wall art is simpler than you think. Gather a few basics: canvases or sturdy panels, acrylic paints or markers, brushes or styluses, painter’s tape, stencils, scissors, glue, and a measuring tape for precise spacing. Have a clear inspiration image ready to guide your color and layout.
Prep your space and wall: clean the surface, choose a color palette that complements your home decor, and test how your colors look with a small swatch. When you’re ready, pick your mounting method (framed canvas, floating shelf, or adhesive strips) so your pieces hang securely.
How can I choose a DIY wall art style that fits my home decor?
Think of your room’s vibe first—calm neutrals, bold accents, or playful patterns. Start with a mood board featuring textures, colors, and existing furniture. For home decor, pick a theme (abstract, botanical, geometric) and ensure your chosen colors appear in small doses around the room.
Then test scale: large pieces work best over sofas or beds, while smaller frames create a gallery wall. Finish with consistent framing or cohesive frames to tie the look together.
What are budget-friendly DIY wall art ideas that still look high-end?
Budget-friendly tricks: print ready art from free sources, create a gallery wall with thrifted frames, use stencils to paint geometric patterns, try canvas transfers from fabric, or do tape-masked color blocks. Use DIY wall art as a statement piece by pairing one bold canvas with several minimal prints to mimic a costly gallery.
Upgrade look by priming and sealing with a matte finish, or add a simple frame with decorative corners. With a little planning, you can achieve a polished, high-end vibe on a budget.
What’s the best way to hang DIY wall art so it stays level and safe?
Plan your layout first on the floor or wall using painter’s tape and a level. Use appropriate wall anchors for weight; heavy canvases should go into studs when possible. For frames or lightweight art, picture hooks or adhesive strips work well.
Measure center height (eye level is usually about 57–60 inches from the floor) and use a level to ensure straightness. Consider wall type (drywall, plaster, brick) and choose hardware that suits it. This keeps your DIY wall art securely displayed.
How can I customize wall art for small spaces or rental walls?
For small spaces, go vertical with a tall piece or a modular gallery you can rearrange as you like. Use a cohesive color palette and scalable frames to create an impact without clutter. Try removable options like washi tape frames, removable decals, or lightweight canvases with Command strips.
Renters will love avoiding nails—opt for freestanding shelves or panel layouts that don’t damage walls. Texture and color pops can transform a wall instantly, making your space feel personalized and inviting with home decor flair.
Related Topics
DIY wall art
home decor
modern design
budget friendly
easy projects
wall decor
beginner friendly
art techniques
upcycled art
minimalist style
seasonal decor